
✅ HOW TO: Getting started with Spa Planner
Overview
The recommended setup order is:
- Have a spa provider in Planniac (prerequisite) even if you don't have a dedicated spa facility
- Configure spa defaults
- Configure spa hours
- Create treatment rooms
- Create therapist skills
- Create treatments
- Configure therapist shifts
- Add therapists
- Begin scheduling appointments
Where are these settings?
These settings exist in 2 places:
Admin tab on the far right of the page - it's a small vertical tab
Staffing link right below the calendar
Step 1: Configure spa defaults
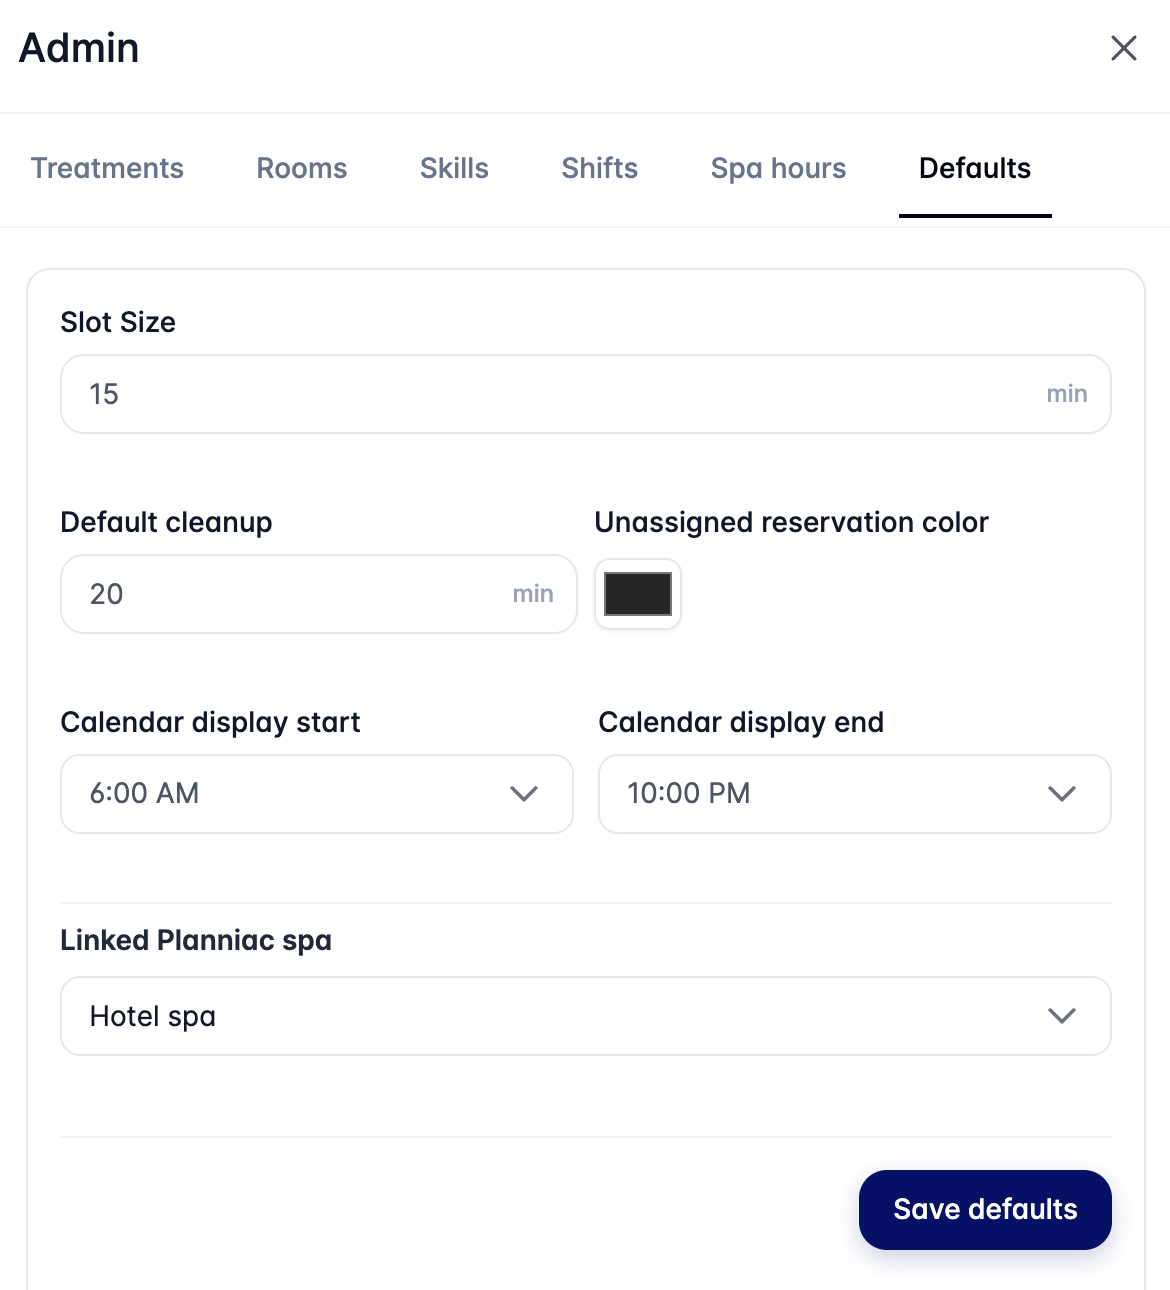
Spa Planner → Admin → Defaults
Slot size means the increments with which you'll accept bookings. 15 minutes is typical, but you might choose 30 minutes.
Default cleanup is a standard amount of time you need to turnover a room and/or therapist for another booking
The unassigned reservation color will appear on the spa planner when you don't have a therapist assigned. This needs to be a very noticeable color that is not the same as any team member color. We like using black or light grey.
The calendar display start and end are not the same as your spa hours. This setting just controls whether you see closed hours on both sides of the calendar.
The linked Planniac spa is essential. This is the Provider name that you have given your spa in Planniac. Any activities assigned to this provider will appear on the Spa Planner treatments list. Any activities assigned to other spa providers will not appear in Spa Planner.
 Step 2: Configure spa operating hours
Spa Planner → Admin → Spa hours
Set the hours during which appointments may be scheduled.
Example 1:
Monday–Sunday
9:00 AM – 6:00 PM
Example 2:
Tuesday–Friday
9:00 AM – 6:00 PM
Saturday–Sunday
9:00 AM – 8:00 PM
Monday (closed)
Exceptions
You can also create exceptions for spa closures or special openings. For example, if you're closed on public holidays or decide to be open on a certain Monday when you're normally closed.
Step 3: Create treatment rooms
Navigate to:
Spa Planner → Admin → Rooms
Create each room available for treatments.
Examples:
- Massage Room 1
- Massage Room 2
- Couples Room
- Facial Room
- Outdoor Cabana
- Sauna
Each room can have its own capacity and availability.
Step 4: Create therapist skills
Navigate to:
Spa Planner → Administration → Skills
Skills help determine which therapists can perform which treatments.
Examples:
- Massage
- Deep Tissue
- Facial
- Aromatherapy
- Reflexology
Step 5: Create treatments
Navigate to:
Spa Planner → Administration → Treatments
For each treatment, define:
- Name
- Duration
- Cleanup time
- Pricing
- Eligible rooms
- Required therapist skills
Examples:
- 60-minute Relaxation Massage
- 90-minute Deep Tissue Massage
- Couples Massage
- Facial Treatment
Step 6: Configure therapist shifts
Create standard shift patterns used by your team.
Examples:
- Morning Shift
- Afternoon Shift
- Full Day Shift
- On-call
Step 7: Add therapists
From the Staffing part of Spa Planner, create spa staff members by linking to Planniac Team Members with Spa roles and assign:
- Skills
- Working hours
- Availability
- Time off
Once complete, the scheduler can begin matching therapists with treatments.
Step 8: Start booking appointments!
After setup is complete, appointments can be scheduled directly from the Spa Planner calendar.
Further setup will allow you to use Planniac's upsell to promote and book spa treatments, and to use Cloudbeds add-ons for popular spa treatments.
Front desk staff will be able to book treatments from Day View or Planns page.